 Hi there! Welcome to my blog! I love, love, love talking about all things metaphysics, writing, and blogging. My hope is that you leave here feeling much better than when you came. It's great to see you!
I’D LOVE TO…


One of the things I’m asked most often from friends and family is how to start a blog. I get so excited when people want to start blogs, because they’re such great creative outlets, and anyone can set one up in no time.
So I decided to write a post today about how to get up and running with your very own blog. If you follow the steps below, it will only take you about an hour before your blog is up and running, and you’re writing your first post!
So grab a cup of joe, find a comfy chair, and start creating! 
1. Buy a domain name and hosting with Go Daddy.
I use Go Daddy for this blog, but there are many other hosting companies out there that are probably a lot cheaper (Blue Host or Hostgator come to mind). Regardless of which you use, the set up should be about the same.
Instead of me trying to capture screenshots of how to do this, I found a YouTube tutorial that tells you exactly how to buy a domain and hosting account with Go Daddy, and install WordPress. Watching this tutorial will teach you exactly how to set up the technical part of starting your very own blog.
(Note: The tutorial is from 2012, and Go Daddy’s site is a little different looking now, but it’s still the same basic concept, so you should have no problem setting up your site through the newer Go Daddy interface.)
2. Install WordPress.
In the YouTube tutorial above, you will also learn how to set up WordPress for your site. I can’t sing enough praises about WordPress. It’s the simplest way to publish blog posts as quickly and beautifully as possible.
If you’re unfamiliar with WordPress and what it is, it’s basically the platform you use to publish content and stylize your blog. Once you’ve got your domain name and hosting set up, you’ll use Go Daddy to get WordPress installed onto your site (it’s all in the wonderful tutorial above).
3. Pick a theme for your site.
This is the fun part. Once you’ve got your domain, hosting, and WordPress set up, you’ll want to pick a theme. This is the style and look of your blog.
First, log into your blog at yourdomain.com/wp-admin. This is the URL you will always go to in order to publish a blog post.
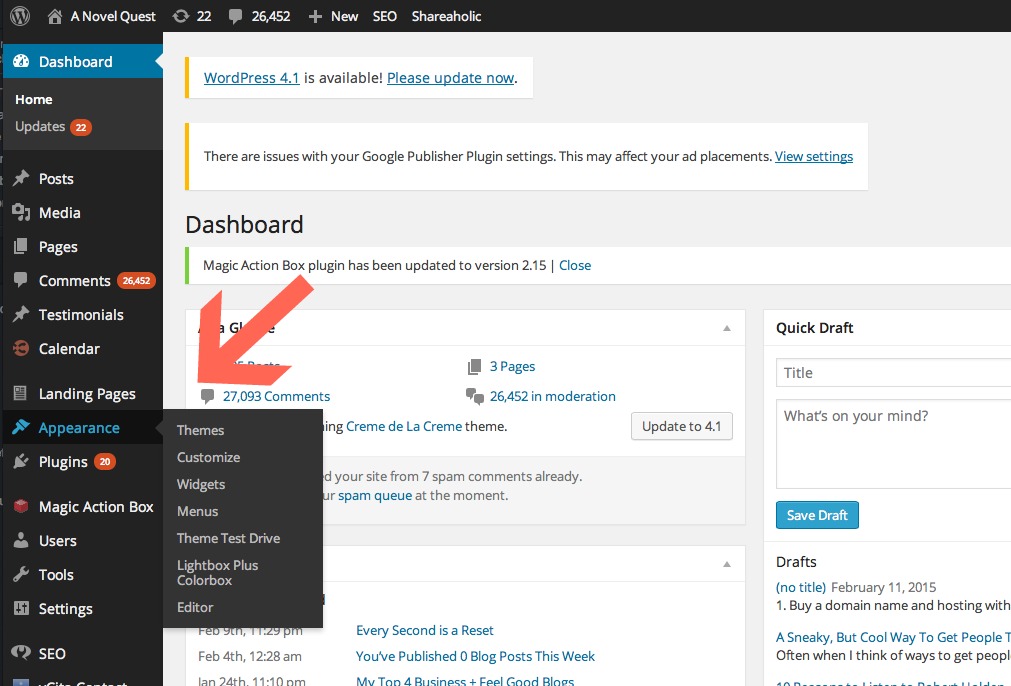
Once you’re in the platform, on the left hand side click on the ‘Appearance‘ section, then ‘Themes‘. See below.
Once you’ve selected ‘Themes‘, it will take you to the Themes page. Click on the button ‘Add New‘ when you get there. See below.

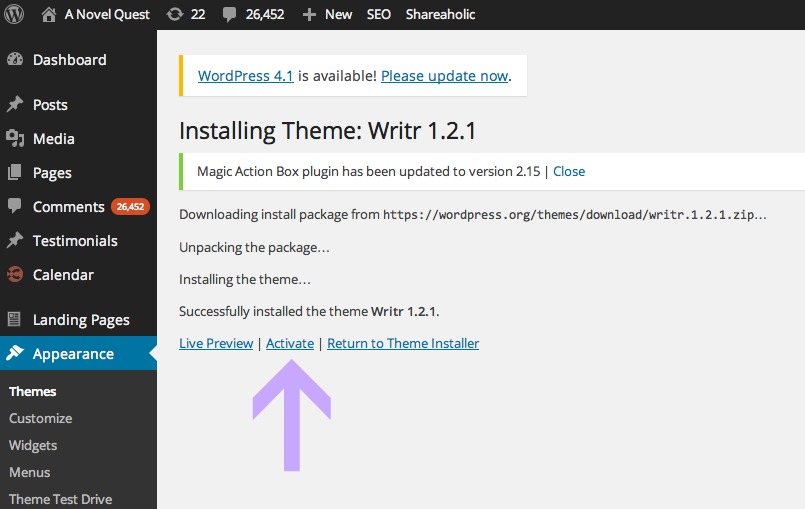
The ‘Add New‘ button will take you to the page with all of the free themes you can get with WordPress. Once you find one you like, you can click the blue ‘Install‘ button for the theme, and it will take you to a page that looks like this, where you’ll click ‘Activate‘ to activate a theme style for your site.
My advice would be to pick a theme that is simple at first, and doesn’t require too much heavy lifting to alter the design. Most templates will come with instructions where you can edit the template by adding your own personal header, and customize your colors. These are the best to start out with in the beginning. If you try to get too fancy with the design in the beginning, you might really start irritating yourself, (as is what happened with me).
I would recommend getting something up that is simple and easy, and start publishing a few posts to get an idea of what kind of content you’re going to be publishing, and then working on the design from there.
In terms of design for your blog, you can also purchase awesome blog templates from Etsy. Many of them are cheap (about $25-$35), and come with instructions to install it.
I personally used this shop called Don’t Tell Anyone to find my current template on Etsy, but I’ve made a ton of revisions to it. The great thing about those templates though is that they get installed for you, and once they’re done, you visit your blog and it’s absolutely shimmering.
4. Publish your first post!
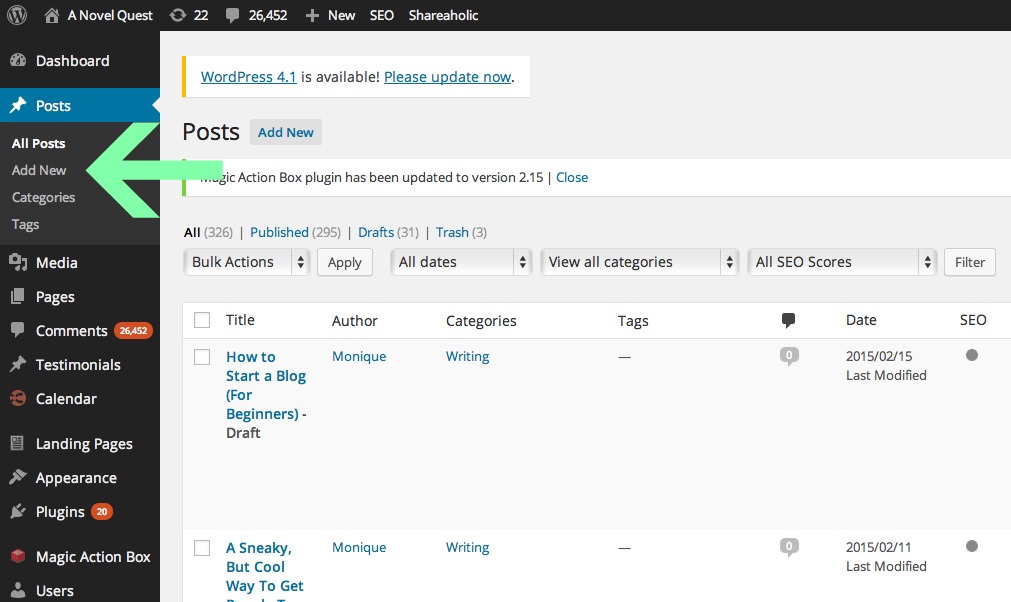
Once you’ve got a theme that you are happy with, or even before this step, start publishing your fresh content! In order to do this in WordPress, click ‘Posts‘ then ‘Add New‘ from the left hand side of the screen on the menu bar.
Once you click ‘Add New’, you’ll come to the page where you can write and publish your posts!

As you’re writing your post, you’ll want to hit the ‘Save Draft’ button on your right hand side periodically to make sure your work is saved (see screenshot below). WordPress will save it automatically every few seconds, but I just like to give it an extra save as I’m going, to make sure nothing gets lost.
Once you’re done with your post, you can hit ‘Preview‘, which is next to the ‘Save Draft‘ button, so you can see what your blog post will look like before you publish it.
You can also hit the ‘Add Media‘ button (below the title in the screenshot above) to add in pictures to your post.
Once your post is all set to go, hit the ‘Publish’ button, and your post will be live!

And there you have it! It may seem like a lot, but really, it’s super simple. It’ll take about 30 minutes to get your domain and hosting all set up, but once all that is done, you can start prettying up your corner of the internet with all of the things that interest you.
Feel free to reach out to me if you have any questions about this, and I’d be happy to give you some advice!
Keep Reading
My Top 4 Business + Feel Good Blogs
You’ve Published 0 Blog Posts This Week
Monique Muro
Latest posts by Monique Muro (see all)
- See Ya, Twenties! [1 Day to 30] - August 25, 2015
- This Is My Official Goodbye Post [2 Days to 30] - August 23, 2015
- We Made It Perfect [3 Days to 30] - August 23, 2015